The collaborative platform for educational
DIY Science Projects

How to use ? - Faraday torch

  • Step 1

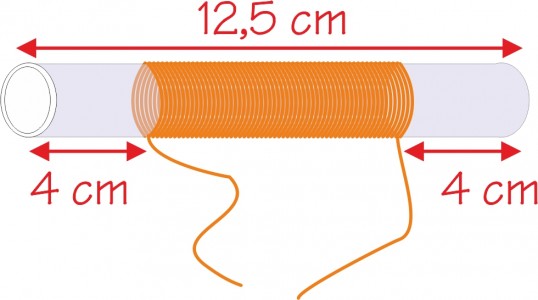
    Wind the copper wire around the centre of the tube on a width of about 4 cm .


    It is important that the coil is thick enough.


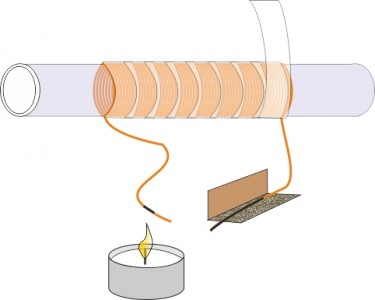
    When finished, wrap some transparent adhesive tape around the coil to avoid it from unwinding.


  • Step 2

    Using the flame of a candle, melt the varnish at the two ends of the copper wire on about 2-3cm.


    Take off the soot with some fine sand paper.


  • Step 3

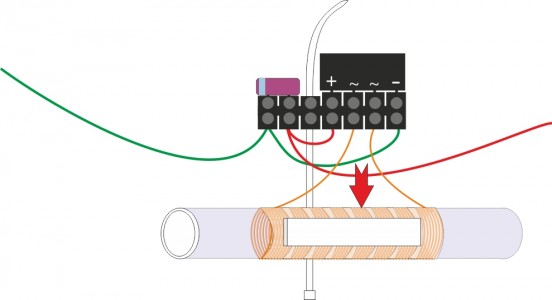
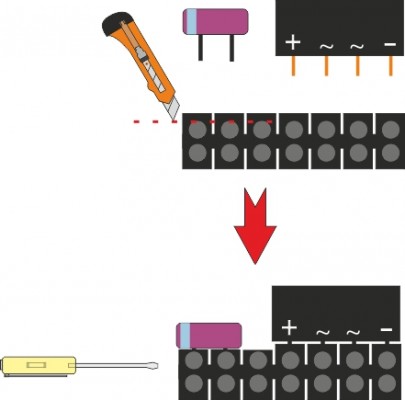
    Cut off the plastic part of three of the connectors of the 7 connectors strip. This will help the small "feet" of the condenser to reach the contacts.


    Connect the "feet" of both the condenser and the rectifier to the strip of connectors. Screw them tightly to ensure a good contact . 


    Avertissement Follow exactly the way the different elements are connected on the drawing (the negative terminals of the condenser and the rectifier are facing the outside of the strip of connectors - the condenser's negative terminal is indicated by a coloured stripe).


  • Step 4

    Strip the ends of all electric wires. Connect the wires and the two copper coil ends to the electric block exactly as shown on the drawing.


    The two electric wires with a loose end must measure about 25 cm long to allow an easy final  assembly.


    Avertissement Follow exactly the way the different elements are connected on the drawing. If possible, use electric wires of different colours.


  • Step 5

    Stick a strip of foam tape on the coil. Stick on top the strip of connectors and fasten it to the tube with a cable tie.


    Shorten up the cable tie with a pair of cisors.


  • Step 6

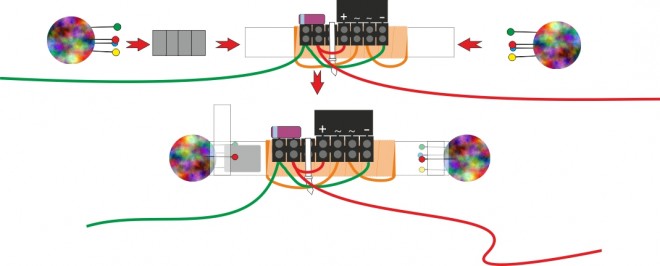
    On each magic ball pick 4 pins so that they can surround and hold the tube without slipping from it.


    Put the range of magnets inside the tube.


    Close both ends of the tube with the balls and wind around the pins some adhesive tape to fix the balls to the tube.


  • Step 7

    Cut the two PET bottles to create two parts that can be joined and hold tightly inside the tube with the two balls .


  • Step 8

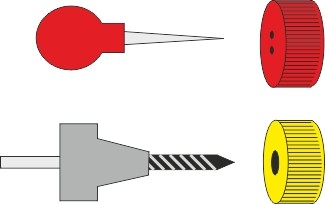
    Using a drill with a 10mm bit, make a hole in the centre of one of the caps.


    Punch two little holes close to each other in the other cap to allow the two "feet" of the LED to pass through. 


  • Step 9

    Pass the two "free" electric wires from the inside of the bottles and out through their necks.


    Pass a long electric wire through both bottle necks.


    Carfully place the tube with balls inside the two bottles.


  • Step 10

    Hold the two bottles tighly against each other.


    Fix the two bottles in place with some large transaprent adhesive tape.


  • Step 11

    If needed, shorten up the wires coming out of the bottles.


    Connect the two red wires to the switch.


    Pass the switch from the inside of the cap with the large hole and screw its cover back on the other side.


    Pass the "feet" of the LED through the two small holes in the other cap and connect them on the other side to a pair of electrical connectors (to fit the pair of electircal connectors inside the cap, it's better to cut it as close as possible of it's metal contacts).


    Connect the remainging free wires coming out the bottle to the pair of electrical connectors.


    Screw back the caps on the bottles.


0 Comment(s) | Add